The science of Mudras is a big part of yoga and is based on the fundamental principles of life and the five elements of Fire, Air, Ether, Earth and Water corresponding with each finger of the hand.

They are mainly performed as gestures by fingers, hand positions combined with yoga postures or are performed on their own. They are also often done during meditation.
Mudras also known as energy controls hold electromagnetic power which is said once held maintains equilibrium in the body elements.
There are even prescriptions of holding particular mudras for set periods of time for rejuvenating the body, healing diseases and to also help with focus. A mudra for any ailment!
The Yoga Synergy sequences incorporate them within their system and is a great opportunity to experience their effects whilst practicing yoga.
For the purpose of these next few posts we will keep the focus on particular hand mudras and later expand into generating mudras within postures.
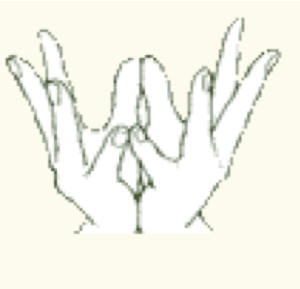
PANKAJ MUDRA or also known as the Lotus Mudra
Is a symbol of purity and offering, and a part of worship.
In this mudra both the thumbs and little fingers touch each other.
This mudra is said to develop the fire and water elements as well as balancing them out.
‘Like a lotus, which remains detached from the mud in which it blooms, a practitioner remains detached from the mud of attachment, while continuing their meditation.’
This mudra has a cooling effect on the body, the nervous system improves and the mind becomes calms. It’s said to be a great pacifier for fevers and to work well with blood disorders.
For me I feel like my whole mood lightens up when I make this gesture it makes me want to smile. Try it out for yourself and leave a comment below!
.
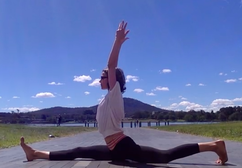
I proceeded to do the splits right there and then, with no preparation.
Well, let’s say I managed the position but did something to my butt that had me limping for a month!
These days I can do the pose almost first thing in the morning as I have been practicing for many years. However, most people will need quite a bit of preparation.
The splits should not feel like too much stretching. It is not about splitting apart.
Working actively means the pose is actually about coming together again.
You remain at whatever stage you feel comfortable in (feel like lengthening and relaxing, not stretching and tugging). But first, some keys to practice. Below I have shown step-wise progression into the posture.
Hover the curser over the photos to see the steps
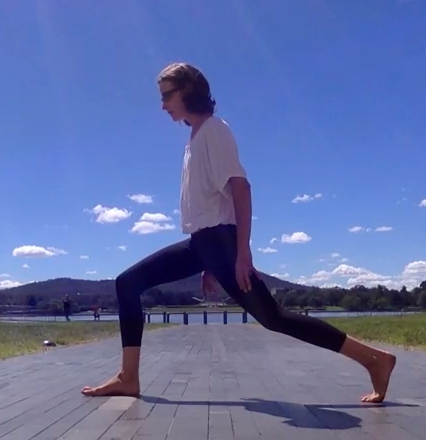
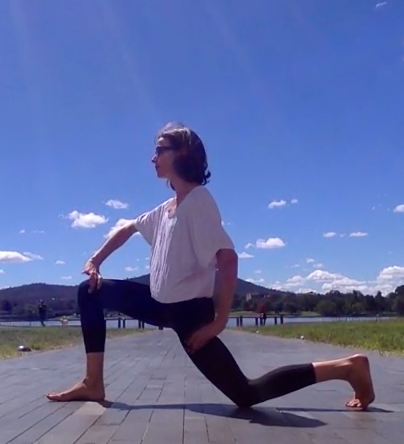
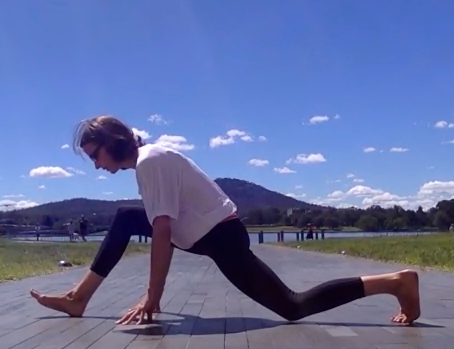
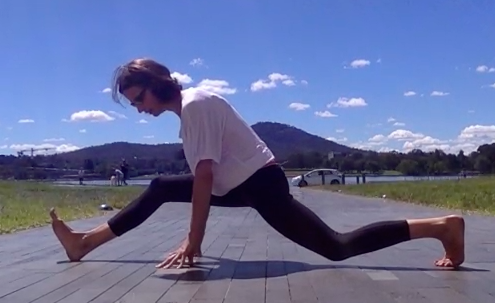
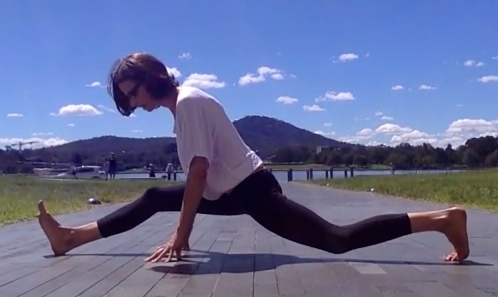

There are two key things I am doing in each stage. The first also has a little subplot.
The back thigh is rolling in, which means you might feel the inner thigh firming a little. If you could turn around and see your knee is trying to move so it is more towards the centre line of your body.
The subplot here is that I am also trying to move the side of front hip back and draw side of back hip forward.
If you are not mindful the opposite tends to happen. That is, when you roll the front thigh out it can often bring the side of front hip forward and when rolling the back thigh in it can often send the side of back hip backward. So you need to watch out for this.
The second key thing I am doing is to try to suck my legs or feet together.
Yes. I am not actually trying to split them apart.
Sucking them together could be likened to someone at foot trying to push your legs back together (what I am doing).
Whereas most beginners just try to let their legs come apart. Actually, they do not even do that so much as let the weight of their entire pelvis and torso just hang and sag in the middle. Its not a pleasant feeling. Sucking it up is key.
In our yoga practice of this pose we need to be thinking of trying to draw our feet back together again (while they move apart).
This makes the posture active rather than passive.
It will help make you stronger and more mobile.
The video shows these movements in action. I have also provided a 2nd video to show advanced variations of the posture (intended for demonstrational purposes).
|
|
|
- Arms Balances
- Balanced Eating
- Bali Retreats
- Blog
- Cacao
- Chlorella
- Coffee
- Community
- Core
- Deconstructing Yoga
- Detox
- Detoxing
- Farmers Market
- Farming
- Flying High Yoga
- Gardening
- Hanumanasana
- Healing Crisis
- Karma Yoga
- Living Food
- Lotus
- Mediation
- Menu Planning
- Moods
- Moringa
- Nature
- Organic
- Outdoor Practice
- Overindulgence
- Padmasana
- Paul Lowe
- Pranic Healing
- Raw Bread
- Raw Chocolate
- Raw Food
- Raw Food Testimonial
- Raw Italy
- Raw Transition
- Recipes
- Rwa Food Testimonial
- Shoulderstand
- Silence
- Slow Food
- Sonja Eberhard
- Spinal Movements
- Splits
- Spring Clean
- Stress
- Testmonials
- Uncategorized
- Wellbeing
- Yoga
- Yoga Retreats
- Yoga Synergy
- February 2021
- September 2020
- July 2020
- January 2020
- September 2019
- November 2017
- October 2017
- November 2016
- October 2016
- September 2016
- August 2016
- July 2016
- March 2016
- February 2016
- January 2016
- November 2015
- October 2015
- September 2015
- August 2015
- July 2015
- June 2015
- March 2015
- February 2015
- January 2015
- December 2014
- November 2014
- July 2014
- June 2014
- October 2013

Our aim is to explore the art of living through healing programs that offer nutritional raw food guidance and the chance to enjoy a personalized wellness program, as well as cultural experience with yoga, meditation, breathing techniques, healing workshops, restorative practices, and much more. Keeping in mind the benefits that yoga endeavors, daily morning yoga sessions are held for practitioners of all levels. Indeed, it is one of the top yoga retreats in Bali for newbie’s that offers raw vegan cooking workshops, pampering spa treatment, daily meals with desserts, and a visit to the special holy water temple that tourists don’t get to see. Your warming stay will be either at a contemporary tropical bungalow named Batu Umpug or at a 37-room boutique wellness hotel called Alaya Resort Jembawan. <img class=”alignright wp-image-1800″ src=”https://www.artofliferetreats.com/wp-content/uploads/2019/09/trees.png” alt=”” width=”654″ height=”442″ data-mce-src=”https://www.artofliferetreats.com/wp-content/uploads/2019/09/trees.png” />
Categories
Archives
Our aim is to explore the art of living through healing programs that offer nutritional raw food guidance and the chance to enjoy a personalized wellness program, as well as cultural experience with yoga, meditation, breathing techniques, healing workshops, restorative practices, and much more. Keeping in mind the benefits that yoga endeavors, daily morning yoga sessions are held for practitioners of all levels. Indeed, it is one of the top yoga retreats in Bali for newbie’s that offers raw vegan cooking workshops, pampering spa treatment, daily meals with desserts, and a visit to the special holy water temple that tourists don’t get to see. Your warming stay will be either at a contemporary tropical bungalow named Batu Umpug or at a 37-room boutique wellness hotel called Alaya Resort Jembawan. <img class=”alignright wp-image-1800″ src=”https://www.artofliferetreats.com/wp-content/uploads/2019/09/trees.png” alt=”” width=”654″ height=”442″ data-mce-src=”https://www.artofliferetreats.com/wp-content/uploads/2019/09/trees.png” />
