Holding on to anger, resentments, hurt and pain rather than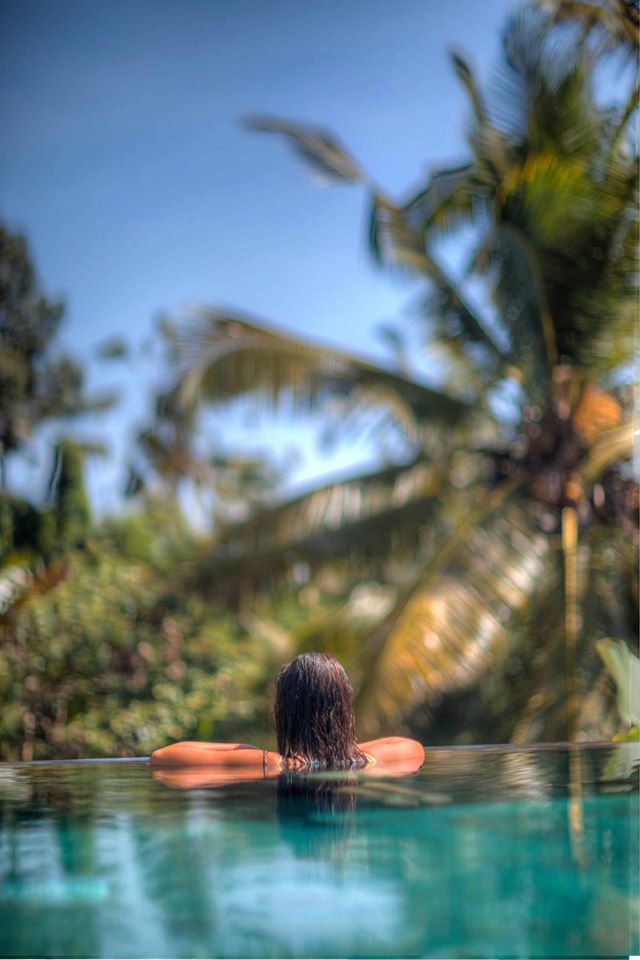 forgiving is something that is very detrimental to our health.
When we can resolve major issues like power, control,
abandonment, jealousy, and anger issues the sooner we can move out of the drama and into a really creative, productive and exciting life in which we are truly growing!
When we overeat eat cooked foods, processed foods, junk foods, packaged foods loaded with chemicals, over-salty & over-flavoured foods, or we overeat then our colon is stressed. And when our colon is stressed, we are stressed. And then it’s much harder to be kind, positive, loving or forgiving.
We are so addicted to foods that harm us. And so it is easy to get addicted to addictive negative
emotions that harm us too.
And just as much it’s easy to get addicted to anger, hate, confusion, sadness, despair. Powerful emotions generating powerful addictive chemicals in our body.
But when we eat a raw diet, it’s possible to break the cycle. Diet and emotions work together in so many ways. And interesting that eating a diet which is not addictive in any way, we become free of addictions. We think more clearly. We aren’t so easily stressed.
This is what we focus on our retreats. We do a week of raw food, eating our way into health one bite at a time. We workout and bring play back into our life. And we do our inner work. And together these planes support each-other to generate a huge forward momentum that we are truly shift into a whole new way of life and a whole new level of vibrancy!
We offer personalised retreats to support you in any transition; a holiday just for you. Please see our personalised page for all the details.
Lots of exciting news to share, so much is transforming!
Our retreats are taking a big turn in a new direction. We are restructuring our attention towards opening up the week to create space for radical healing in response to people’s desire to get answers and discover what is happening to them in these shifting times.
To match the transformation we are excited for our new collaboration with people who are committed to creating change, who are pioneering a new way of being by what they stand for.
It’s the Art of Life Retreats with more power and intention!
We’ll be fueling our bodies with organic living foods. Yes!
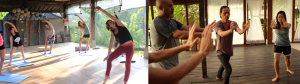
We’ll be flowing with Yoga Synergy. Perfect for beginners who want to start moving their bodies, and perfect for those who are fluent and want to find more grace and ease in a more advanced practice.
We’ll also be incorporating our new love-affair with the movement practice of Qi Gong and going deeper on bridging our connection to our center.
We’ll focus on bringing everything back to ourselves. There will be sessions in self healing, releasing unserving habits and looking into the control settings of patterns to ultimately come closer to restoring our factory settings. Freedom!
This is the perfect opportunity for those wanting to make real change in their lives, to resolve the unresolved. We’ll create a space to cultivate energy and then apply it to deepen our intuition and connection, to be who we really are. The feeling is fantastic.
This is no ordinary retreat. We are coming together to catalyse change.

30th April – 5th May 2016
Notice something different?
Our April-May retreat has had to be reduced to 6 days – We aren’t reducing the offerings, we’ll just be packing more in, but we are offering a super special discount in lieu of the unexpected changes.
Book 2 places together for US$2,000 all inclusive for 2 ~ perfect for couples, best friends and partners in support of coming to experience the retreat week together.
Limited spaces, reserve your spot now info@artofliferetreats.com and for more details see our website www.artofliferetreats.com

We are keeping all of our favourite elements with guest speakers sharing their passion for movement and philosophy, as well as being powered by amazing living food meals that keep us nourished and satiated from the inside out.
Have you seen our new video Come on a magical tour with us!
The science of Mudras is a big part of yoga and is based on the fundamental principles of life and the five elements of Fire, Air, Ether, Earth and Water corresponding with each finger of the hand.
They are mainly performed as gestures by fingers, hand positions combined with yoga postures or are performed on their own. They are also often done during meditation.
Mudras also known as energy controls hold electromagnetic power which is said once held maintains equilibrium in the body elements.
There are even prescriptions of holding particular mudras for set periods of time for rejuvenating the body, healing diseases and to also help with focus. A mudra for any ailment!
The Yoga Synergy sequences incorporate them within their system and is a great opportunity to experience their effects whilst practicing yoga.
For the purpose of these next few posts we will keep the focus on particular hand mudras and later expand into generating mudras within postures.
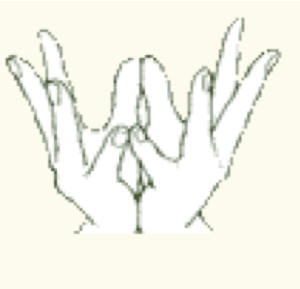
PANKAJ MUDRA or also known as the Lotus Mudra
Is a symbol of purity and offering, and a part of worship.
In this mudra both the thumbs and little fingers touch each other.
This mudra is said to develop the fire and water elements as well as balancing them out.
‘Like a lotus, which remains detached from the mud in which it blooms, a practitioner remains detached from the mud of attachment, while continuing their meditation.’
This mudra has a cooling effect on the body, the nervous system improves and the mind becomes calms. It’s said to be a great pacifier for fevers and to work well with blood disorders.
For me I feel like my whole mood lightens up when I make this gesture it makes me want to smile. Try it out for yourself and leave a comment below!
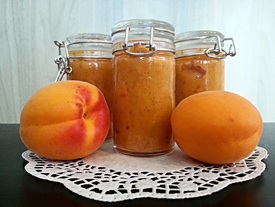 In general jams have been made from the need to preserve fruit so you can enjoy them and their flavours in periods in which it’s hard to source them.
At the time of ancient Rome there were very similar products to jam, made from whole fruit dipped in sweet wine, mulled wine, juice and even honey.
The Italian Geography of fruit and their flavours are:
South Italy, thanks to high temperatures is famous for citrus marmalade.
Lemon marmalade in Sicily, oranges in Calabria and quince and figs in Puglia. In these lands citrus are vast and can enjoy a hot and tireless sun.
Central Italy offers a wide range of grape jam.
In Northern Italy, thanks to the humid climate, the forest fruits are used for jams. Blueberries, blackberries, raspberries and strawberries.
Jam can be made from: cherries, plums, oranges, strawberries, peaches, apricots. One of the greatest benefits of not boiling the fruit unlike the traditional way of making jam is that all the enzymes are intact and so much less sugar is needed. They can enjoyed with raw crackers and breads.
It’s ideal for the whole family.
An abundance of colors and flavours to be tasted at any time of the day: breakfast, snack time and can also be used for the preparation of so many other raw sweets.
I used lemon and dates as the preservative. Dates with its natural sugar enables ‘marmelada’ a 4-5 day life in the fridge.
Ingredients:
- 500g of ripe apricots, or any fruit of your choice
- 7-8 large fresh dates
- Juice-half a lemon
- 1 teaspoon of lemon peel
- ¼ teaspoon nutmeg
Put all the ingredients in food processor and process until a thick mass – the marmelada is formed. It will need 2-3 min, depends of the power of food processor.
Put the jam into a jar, eat and store the rest in the fridge.
Hugs from Italy! :))
Neli Todorov writes an active blog http://nelisraw.blogspot.it/ and shares news of workshops and events on her facebook page
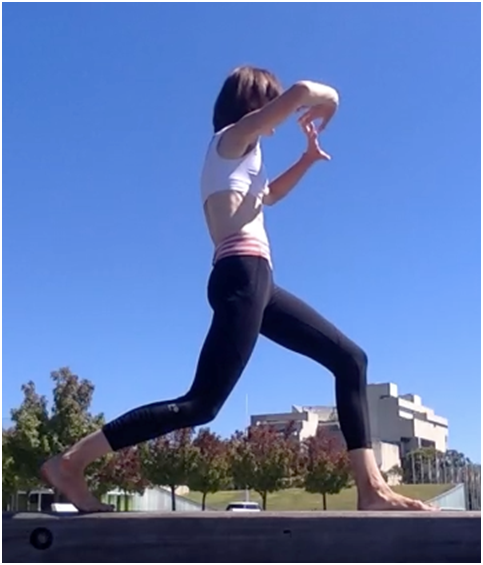
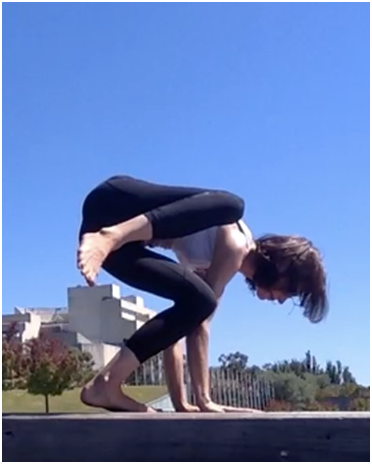
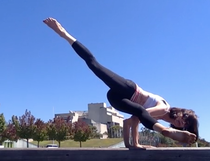 As a teacher I am always trying to demonstrate active movement and show where movement may be coming from. Sometimes this is tricky because what you see may not be where the movement arises.
Also, sometimes a more passive posture may end up looking much the same as the active posture. But the feeling is completely different.
In the first picture I used active spinal movements to come into the pose.
In the second I came in by ‘falling’ with gravity and mainly by flexing my hips.
While they look much the same, the feeling in the torso especially is completely different.
Active movement (spinal forward flexion first) – Non-active movement (hip flexion first)

I don’t want to suggest one is right or wrong. I choose to do the first version in my practice and teaching to help develop strength and mobility in the torso.
Aside from helping my spine feel good, moving actively and having activated muscles around my tummy in particular, helps me come into the arm balance variation that follows this posture in our current sequence.
Here I have to say, I got a six-pack without ever doing a crunch or by adding a ‘core yoga’ section into my classes or self-practice.
I simply do active movements throughout my entire class and am pretty much doing a ‘sit-up’, aka active spinal forward flexion, in every forward bend I do.
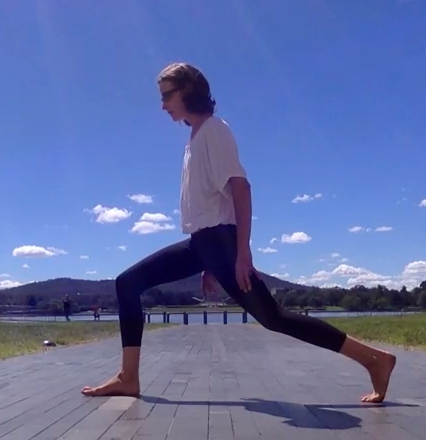
Back to the postures at hand! There are two. A standing posture, then an arm balance.
Watch the video first to get a sense of the flow and process.
|
|
|
Spinally speaking, the standing posture is basically a twisting, side bending, forward bending backbend. That is, once I am in the lunge and lengthen lower back (sitting bones down, top of pelvis back), I do a twist, a side bend, a forward bend, then a little back bend in my upper back. A little hip flexion creeps in but after the spinal forward flexion.
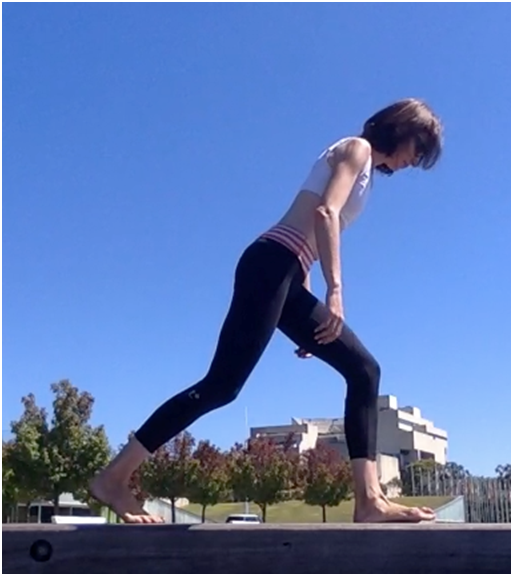
Step 1: Get into a lunge
In this lunge I have my back heel up. That is because I am going to make this posture dynamic and move into the arm balance. Traditionally heel is down.
Many people find having heel up difficult to balance. You need to be using your feet and legs actively to assist with the balance. I grip with my toes lightly.
Also, if you allow your hips to be sinking it is often a sign you are not using your legs actively enough and will make it harder to balance. I keep my hips a little higher and legs active here. Nothing wrong with going lower but just in an active and not sinking way.
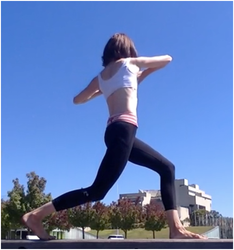
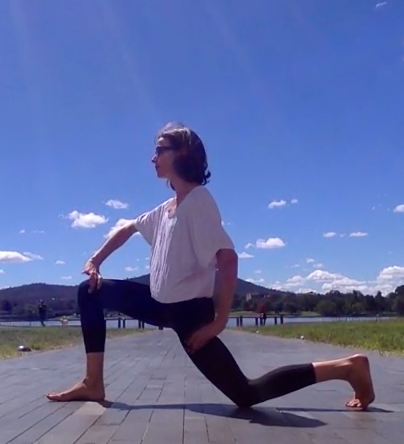
Step 2: Lengthen lower back
Here I have taken sitting bones down, top of pelvis back in order to lengthen my lower back.
To me, this is different and more subtle than ‘tucking under’. Remember, rather than fret about action, go for feeling. The feeling here is to have space in your lower back and not squashing.
In this picture I have also lengthened my entire spine. I have taken my lower ribs back and up lightly. You cannot see my neck but I have head down, neck back slightly to lengthen back of neck.
I have begun to push my armpits forward and lightly down, elbows lightly up.
Step 3: Active spinal twist
I try to move from base of spine upwards. That means, turning from navel, area then lower ribs, then chest, then shoulders.
Look at the front foot. See how much it is still working.
Spine still long, not arching.
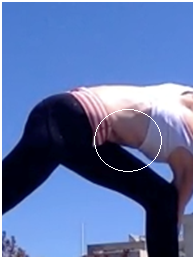
Step 4: Active spinal side bending
Here I initiate side bending by bringing back hip forward and up towards the rib. At the same time I am reaching opposite arm up and forward from my waist/pelvis and trying to move that side hip back slightly so the whole side body lengthens.
The side of my body that closest in this picture is firming. This side bending firmness will help me in the arm balance.
You can see I start to have more weight on my front foot—the back heel is raising as well in preparation for the arm balance to soon come.
At this stage I am in a back lengthening, twisting, side bending posture.
Step 5: Spinal forward flexion
Now I have begun a spinal forward flexion process.
See the space you can see between the top of my thigh and torso and how the angle is still relatively open.
I am now in a spine lengthening, twisting, side bending, forward bend.

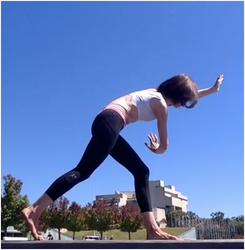


There is no need to go deeper. Unless you are coming to the arm balance, that is!
To get to the ground I need some hip flexion. I initiate hip flexion here, after I have done my active twisting, side bending, forward bend. Importantly, I maintain these actions as I lower.In my own practice I often choose to stay at this point here. It feels really good.
I can do the arm balance easily but for me it seems unnecessary compared to how nice it feels to stay actively in this posture for some time.
At this point a t lot of yoga teachers in classes I have attended will come up and try and get me to put my back heel on the ground, to try and put my hand on the ground, to try and take my legs further apart.
There is nothing wrong with that. But this feels so much better. Perhaps it is not pretty but once you start to appreciate active movements and see what is going on in the posture you see this as something lovely and delicious feeling.
I am not leaning or using the bottom arm on my knee at all. If you were to use it then do so in an intelligent and active way. That would mean using the arm to press lightly into the thigh and pressing the thigh back into the arm. I am definitely not using my arm to ‘wrench’ or twist my spine here. I am also not sinking into it.
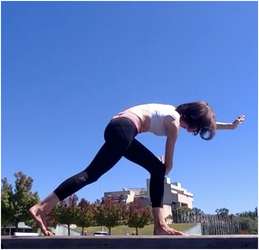
Step 7: More hip flexion and knee bending to get hands to ground
The only way to get to the ground is to get some more hip flexion in there, front knee bends more as well.
A lot more in fact. You can see it has started to come in front of my toes. I need to be firm behind my knee to maintain the integrity of my knee here. My ankles are moderately flexible in a squat so my heel can stay down. If you need it is perfectly fine to lift that heel. In fact, it might help you to keep firm behind the knee.
You can see hands are coming in front of the foot and off to the side.
I am maintaining all of the actions from previous steps. That means my front knee is actually only lightly touching my arm.
Notice how at no stage did I start pushing my arm into the knee to get me into this twist. They are touching lightly here. I do not want that front knee to get heavy. It will become heavy if you are not using your torso actively and you will feel like you are sinking in this posture instead of lifting.
This picture sort of shows you how my whole back body is lengthened, not flattened. You can see I am moving my chest into my upper back and moving my shoulder blades around the sides of my chest.
Notice I am transferring weight forward. You can see this as I am coming more onto the tops of my toes on the back foot.
Step 8: Enhance side bending
Leaning forward with more weight on my hands and pushing the floor away. I don’t want weight on my feet in an arm balance. I need to support it by pushing into the floor with arms to get lift.
I am gripping with finger tips as thought grabbing at the ground (not flattening fingers).
I am maintaining all the core actions.
This allows me to enhace side bending by bringing the back knee into my shoulder. I can only do this without feeling heavy or sinking if I have kept all of the actions in the torso.
You can see weight is more and more over the hands and my front heel has started to lift. I need lightness in this foot to come up.
I squeeze my wrists together and keep feeling as though my elbows are trying to come together.
Step 9: Lean forward, smile, stay firm but calm, and lift
Compare this picture with the previous one and you see my shoulders have come further forward over the finger tips. I have to lean forward without dropping into my shoulders to come into this position.
Actually, let me correct myself. I don’t have to. You can drop and do this but it will probably feel awful on your wrists and shoulders!
If you can sneak a look at my tummy here you can see is it active!
Step 10
Step 10: Legs out!
I continue leaning forward. See how far my shoulders have come in front of wrists. I suppose if you were stronger you would not need to lean as far forward but I am not that strong. I am trying not to lower my chest but to stay lifted.
Maintaining all previous actions, I just straighten my legs.
The top thigh is rolling in and bottom thigh is rolling out.
I am happy and calm and firm and strong and feeling good. If you walked past me I could say hello and tell you how good I was feeling and have a little chat without getting breathless.
In Sum
Remember that this arm balance is just a bit of show ponying really. It looks impressive but it won’t make you happier or healthier!
Staying in the standing version might help you more than the arm balance.
.
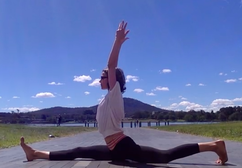
I proceeded to do the splits right there and then, with no preparation.
Well, let’s say I managed the position but did something to my butt that had me limping for a month!
These days I can do the pose almost first thing in the morning as I have been practicing for many years. However, most people will need quite a bit of preparation.
The splits should not feel like too much stretching. It is not about splitting apart.
Working actively means the pose is actually about coming together again.
You remain at whatever stage you feel comfortable in (feel like lengthening and relaxing, not stretching and tugging). But first, some keys to practice. Below I have shown step-wise progression into the posture.
Hover the curser over the photos to see the steps
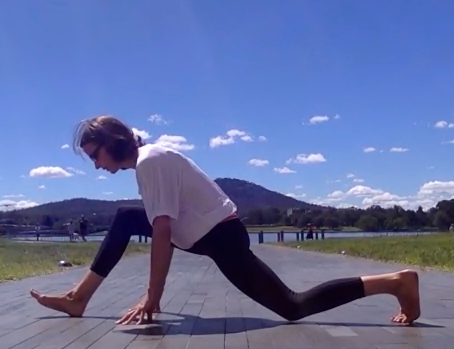
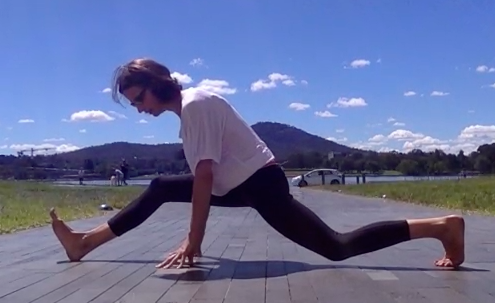
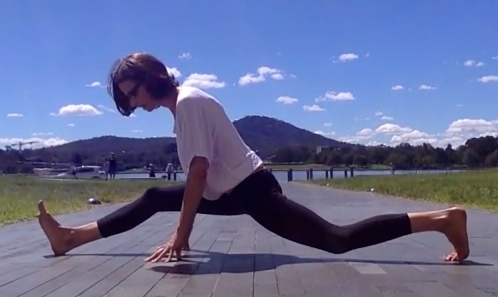

There are two key things I am doing in each stage. The first also has a little subplot.
The back thigh is rolling in, which means you might feel the inner thigh firming a little. If you could turn around and see your knee is trying to move so it is more towards the centre line of your body.
The subplot here is that I am also trying to move the side of front hip back and draw side of back hip forward.
If you are not mindful the opposite tends to happen. That is, when you roll the front thigh out it can often bring the side of front hip forward and when rolling the back thigh in it can often send the side of back hip backward. So you need to watch out for this.
The second key thing I am doing is to try to suck my legs or feet together.
Yes. I am not actually trying to split them apart.
Sucking them together could be likened to someone at foot trying to push your legs back together (what I am doing).
Whereas most beginners just try to let their legs come apart. Actually, they do not even do that so much as let the weight of their entire pelvis and torso just hang and sag in the middle. Its not a pleasant feeling. Sucking it up is key.
In our yoga practice of this pose we need to be thinking of trying to draw our feet back together again (while they move apart).
This makes the posture active rather than passive.
It will help make you stronger and more mobile.
The video shows these movements in action. I have also provided a 2nd video to show advanced variations of the posture (intended for demonstrational purposes).
|
|
|
I wasn’t sure about writing a detox blog this year because it seemed predictable, but something clicked inside of me and I wanted to write about how we can learn to listen more about our body and know when it is time to reboot or reset the button.
There are many reasons why people have the need to clean out the cobwebs. Here the main reasons:
overindulgence
chronic-stress
 fatigue
sluggishness
digestive problems (bloating,skin problems)
Results:
Gain more energy
increase vitality
refined senses
clear mind and focus
positivity
inspired and motivate
Realigning with our internal guidance system is the reason why I detox. I love the way my food-mind -body comes into balance. We need to learn how to listen to our body’s and know when it is time.
Here is a really simple plan.
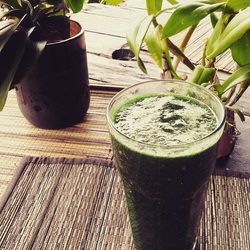
1 big glass of warm water with Lemon or Apple cider vinegar upon rising.
1/2 an hour later 1 smoothie
Ginger/Mint/Mango Smoothie
2 cups firmly packed Greens: spinach, kale, collard, purslane,
1/2 cup mint
1/2 lemon with rind for bioflavanoids
1/2 avocado
1 mango fresh or frozen
2 cups water
1 Tbs. spirulina, hemp powder, maca, optional
Blend in a high speed blender until smooth
Drink lots of water during the day
Coriander, Spinach Sweet Potato Soup
2 cups Spinach or Kale
1/2 cup coriander
1/2 avocado
1-2 Tbs. Coconut oil
1/2 sweet potato cubed
1 small nob tumeric fresh
2 cups water
Blend in a high speed blender and consume around 4 pm
Daily skin brushing – The skin is our biggest organ, by invigorating the whole body we allow the toxins to come out. It’s a really simple process to get the skin smooth and glowing, and also great for those stubborn cellulite areas too!
Sauna – infra-red saunas are the best, but any sauna will steam-clean you from the inside out. Make this a weekly habit for a month and just feel the difference.
Exercise – this means walking, yoga, swimming – get out and about as much as you can.
Meditation – Find a nice tranquil place and make this your special meditation spot. Just 15 minutes a day with the intention of being still and quiet will do wonders for you.
By making small changes to your routine you can experience great benefits. It doesn’t mean you have to go-hard or go-home, it doesn’t mean you need to restrict yourself and push yourself to the edge every time. Just a few simple additions to your daily life will bring a spring back to your step, and you never know perhaps they will become a regular part of your life.
Be happy, love life and shine!
The bare naked sky above you is good for you. That ceiling and those walls just contain you.
The breeze on your face is good for you. That air conditioning (or heating) just dries you out.
The ground beneath your feet–be it grass or dirt or sand is good for you. Wooden floors are nice, don’t get me wrong, but they are inside!!
When you practice outside beneath an open blue sky you look up and feel almost as though you are a part of it. It’s breath-taking.
When you open your eyes from savasana to behold a starry night you can’t help but feel at peace.
It’s awe inspiring.
When you start your pre-dawn practice and watch the sun rise, you feel the sun’s rays shimmering on your skin.
It’s radiant.
When you practice in nature you are continually amazed by the beauty of the world around you.
No matter what wallpaper is pasted, what music is played, or what statues are placed, I will never find a better place to practice than the great outdoors.
On days when I feel exhausted, I always feel better if I just open a window or door.
On days when I think I can’t practice, I simply step outside and find myself drawn to move or sit quietly and meditate.
It might be freezing, it might be boiling. It might be windy, it might be raining.
I simply pop my head outside and figure out what I need to wear and where I can be as sheltered as necessary without ‘succumbing’ to the elements.
It can be hard. Sometimes you need to be creative. But it is always worth it.
One of the main elements on our retreats is to get connected to mother nature. To be inspired and supported by the simple things in life.
Why don’t you try for yourself? Expose yourself to the outdoors and feel yourself embraced by nature.
www.yogacafecanberra.blogpost.com
www.artofliferetreats.com
- Arms Balances
- Balanced Eating
- Bali Retreats
- Blog
- Cacao
- Chlorella
- Coffee
- Community
- Core
- Deconstructing Yoga
- Detox
- Detoxing
- Farmers Market
- Farming
- Flying High Yoga
- Gardening
- Hanumanasana
- Healing Crisis
- Karma Yoga
- Living Food
- Lotus
- Mediation
- Menu Planning
- Moods
- Moringa
- Nature
- Organic
- Outdoor Practice
- Overindulgence
- Padmasana
- Paul Lowe
- Pranic Healing
- Raw Bread
- Raw Chocolate
- Raw Food
- Raw Food Testimonial
- Raw Italy
- Raw Transition
- Recipes
- Rwa Food Testimonial
- Shoulderstand
- Silence
- Slow Food
- Sonja Eberhard
- Spinal Movements
- Splits
- Spring Clean
- Stress
- Testmonials
- Uncategorized
- Wellbeing
- Yoga
- Yoga Retreats
- Yoga Synergy
- February 2021
- September 2020
- July 2020
- January 2020
- September 2019
- November 2017
- October 2017
- November 2016
- October 2016
- September 2016
- August 2016
- July 2016
- March 2016
- February 2016
- January 2016
- November 2015
- October 2015
- September 2015
- August 2015
- July 2015
- June 2015
- March 2015
- February 2015
- January 2015
- December 2014
- November 2014
- July 2014
- June 2014
- October 2013

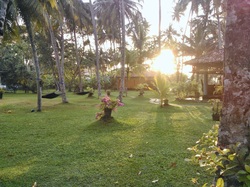
Our aim is to explore the art of living through healing programs that offer nutritional raw food guidance and the chance to enjoy a personalized wellness program, as well as cultural experience with yoga, meditation, breathing techniques, healing workshops, restorative practices, and much more. Keeping in mind the benefits that yoga endeavors, daily morning yoga sessions are held for practitioners of all levels. Indeed, it is one of the top yoga retreats in Bali for newbie’s that offers raw vegan cooking workshops, pampering spa treatment, daily meals with desserts, and a visit to the special holy water temple that tourists don’t get to see. Your warming stay will be either at a contemporary tropical bungalow named Batu Umpug or at a 37-room boutique wellness hotel called Alaya Resort Jembawan. <img class=”alignright wp-image-1800″ src=”https://www.artofliferetreats.com/wp-content/uploads/2019/09/trees.png” alt=”” width=”654″ height=”442″ data-mce-src=”https://www.artofliferetreats.com/wp-content/uploads/2019/09/trees.png” />
Categories
Archives
Our aim is to explore the art of living through healing programs that offer nutritional raw food guidance and the chance to enjoy a personalized wellness program, as well as cultural experience with yoga, meditation, breathing techniques, healing workshops, restorative practices, and much more. Keeping in mind the benefits that yoga endeavors, daily morning yoga sessions are held for practitioners of all levels. Indeed, it is one of the top yoga retreats in Bali for newbie’s that offers raw vegan cooking workshops, pampering spa treatment, daily meals with desserts, and a visit to the special holy water temple that tourists don’t get to see. Your warming stay will be either at a contemporary tropical bungalow named Batu Umpug or at a 37-room boutique wellness hotel called Alaya Resort Jembawan. <img class=”alignright wp-image-1800″ src=”https://www.artofliferetreats.com/wp-content/uploads/2019/09/trees.png” alt=”” width=”654″ height=”442″ data-mce-src=”https://www.artofliferetreats.com/wp-content/uploads/2019/09/trees.png” />
